Revenant ENB
Realism-driven ENB preset based on RealVision ENB. Designed specially for Climates of Tamriel V (5.0) in combination with either ELFX, RLO or Vanilla interior lighting. Users can choose between several performance levels. Features unique installation using your preferred mod manager and a new automated Setup without any copy-pasting/editing files!
Past
RealVision ENB for Climates of Tamriel V
SkyrimTuner’s RealVision ENB is not very well optimized for use with the latest version of Climates of Tamriel. In fact, it isn’t at all.
This will sometimes result in unintended, different or weird visuals, especially so for the skies.
After keeping CoT 3.1 for a while, I decided to go with CoT V while attempting to adjust RealVision instead to make it work better with CoT V.
The first results worked out pretty well and so I continued adjusting RealVision. Since I had noticed a rising demand for RealVision + CoT V, I decided to upload my RealVision based preset to the Nexus as SkyrimTuner retired from modding, with full permissions from him of course. And so, RealVision ENB for Climates of Tamriel V came to be.
Present
Revenant ENB
Revenant ENB is the successor of my RealVision ENB for Climates of Tamriel V preset. Just like its predecessor, Revenant ENB is still based on the original RealVision ENB by SkyrimTuner under the hood (mainly with regard to shaders). It’s just much more personalized and refined than RealVision ENB for Climates of Tamriel V, making it a completely new ENB that deserves a name of its own.
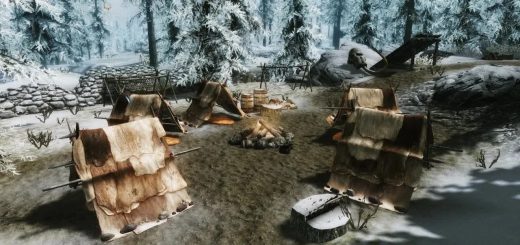
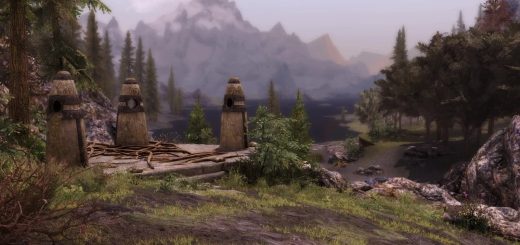
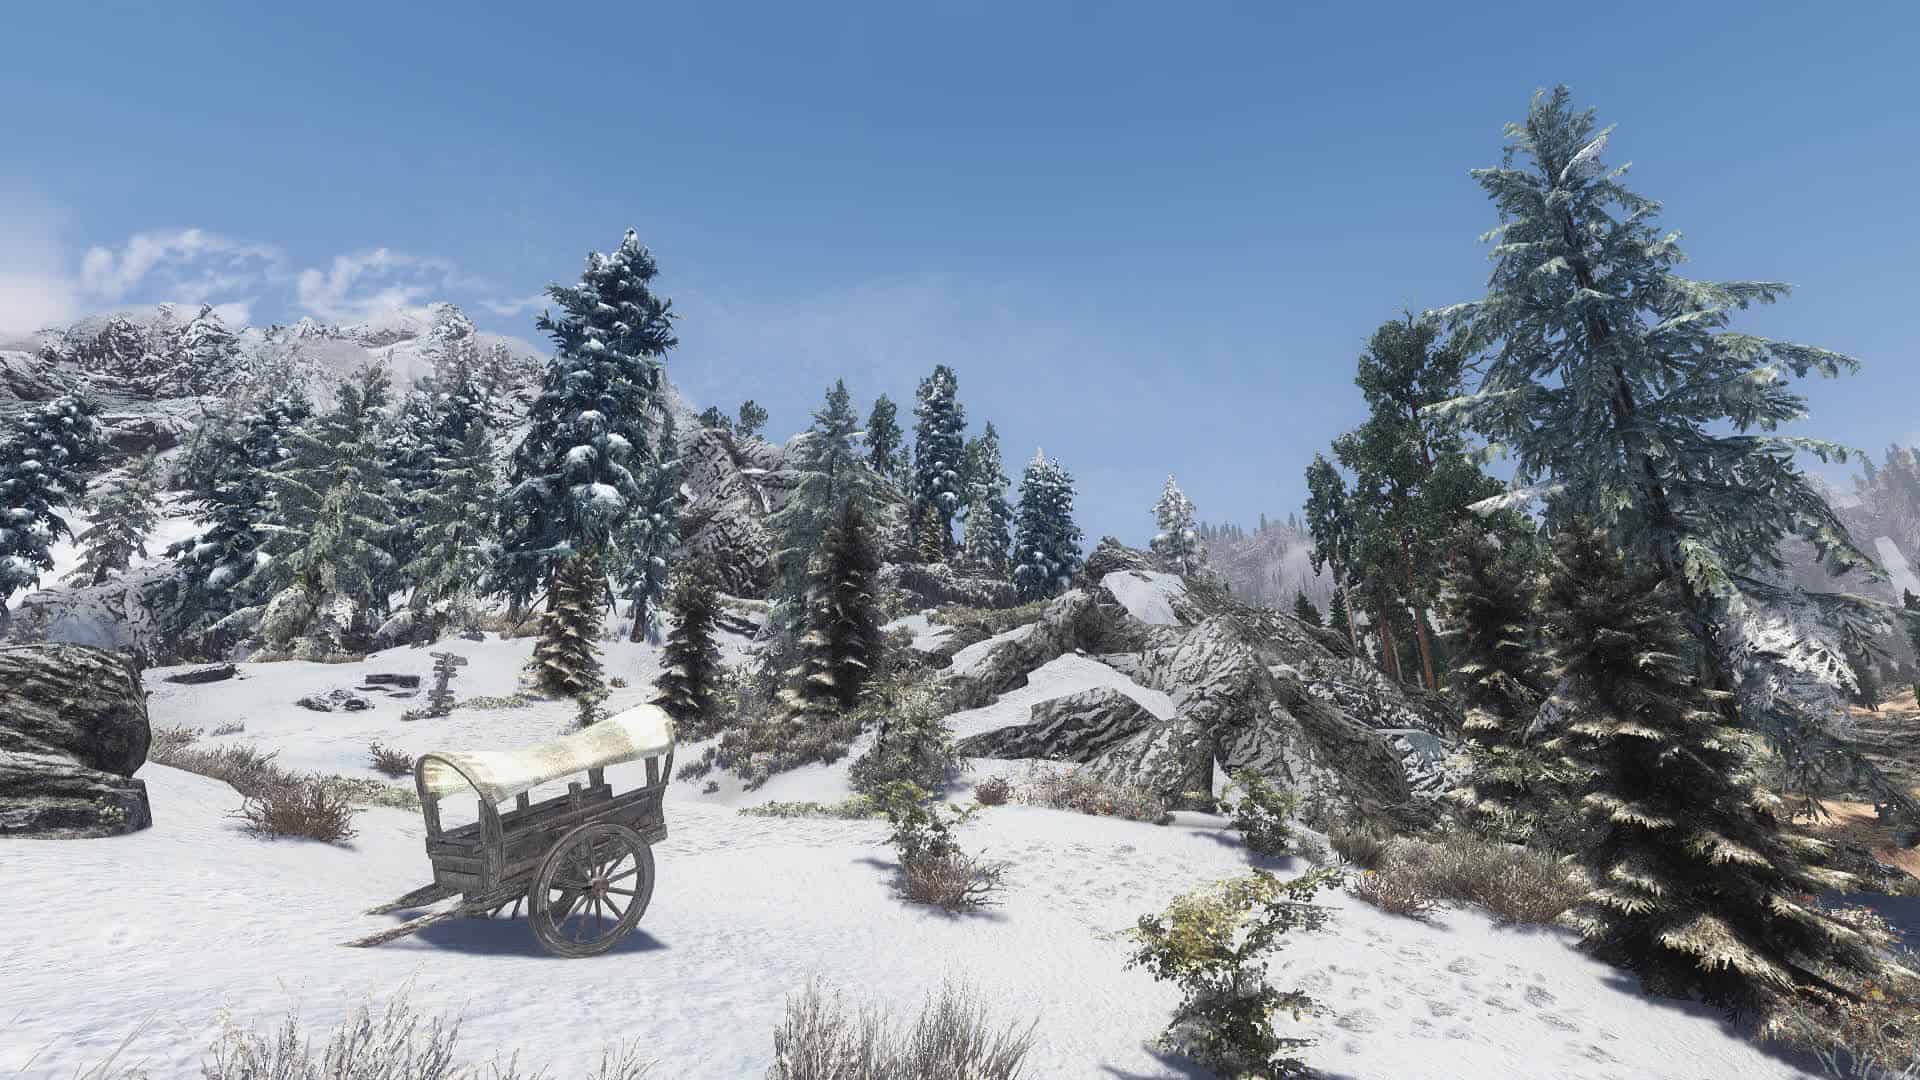
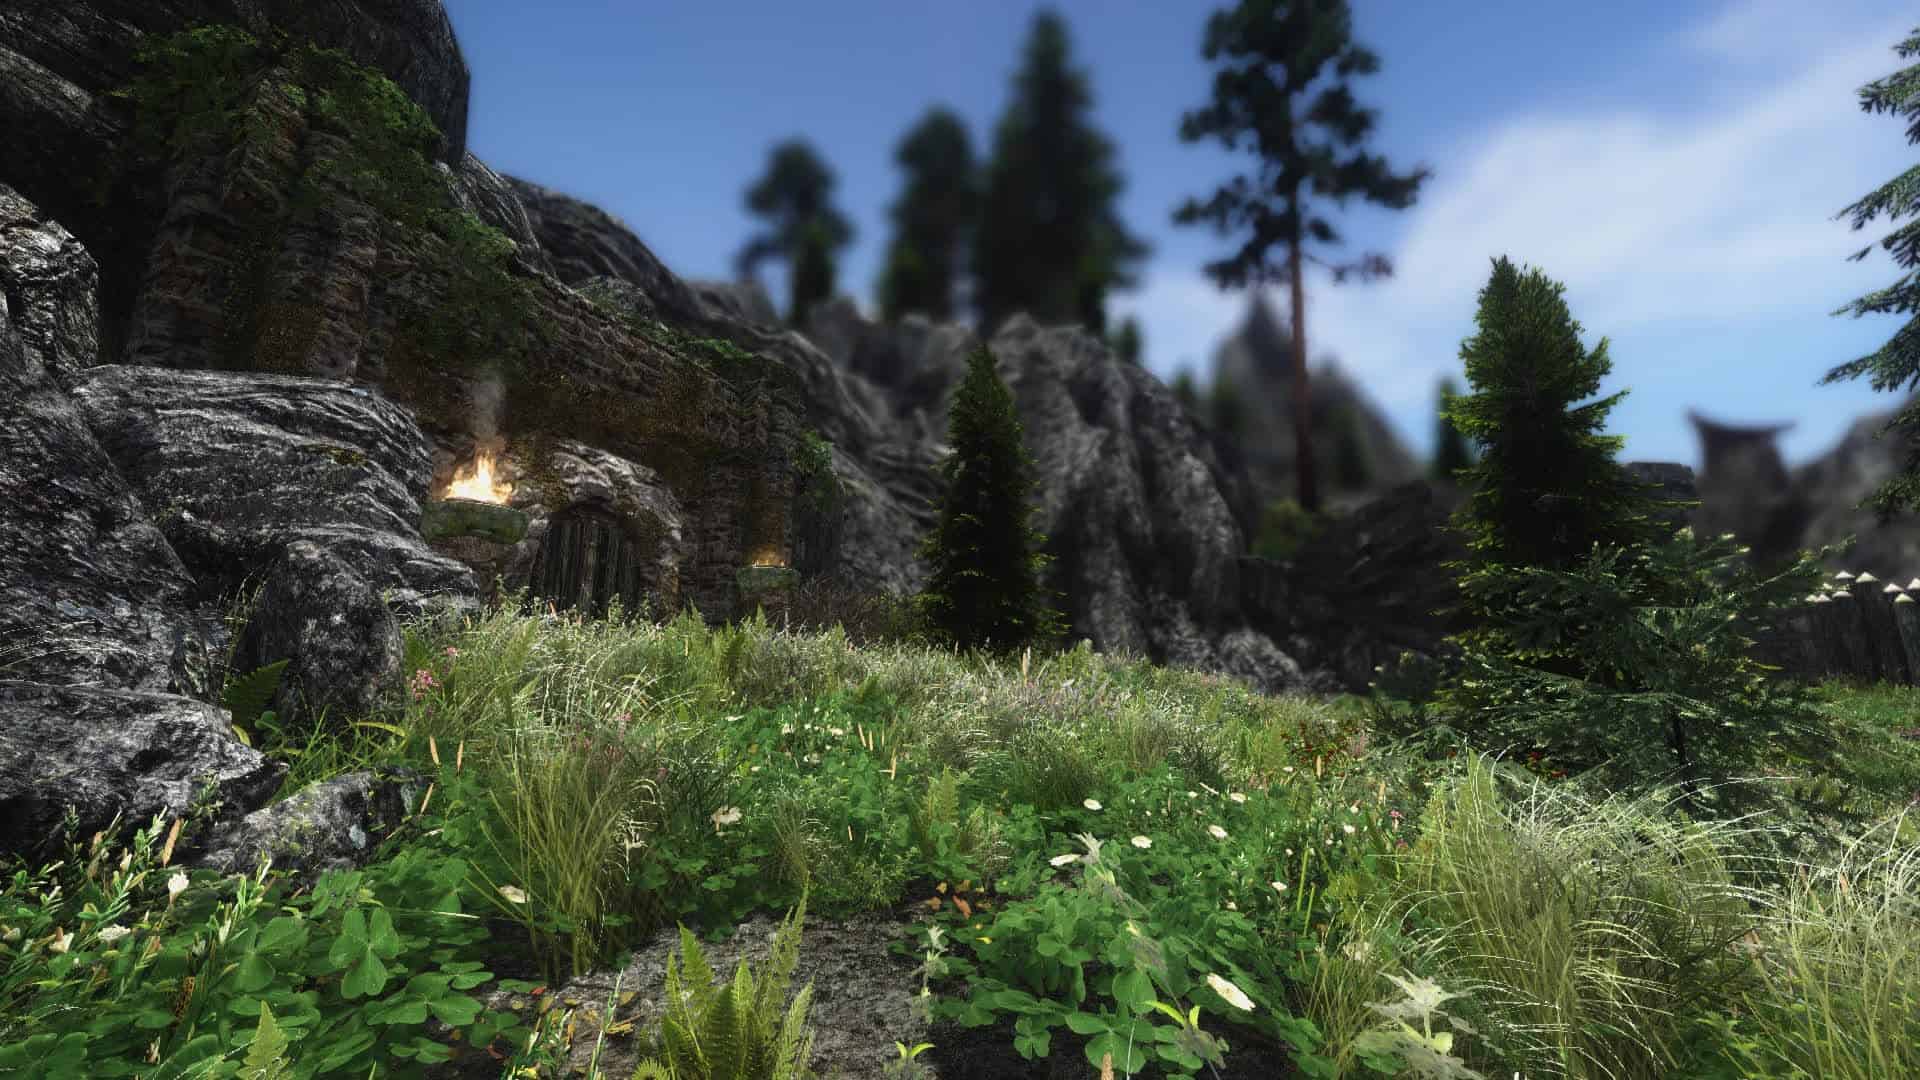
Revenant ENB aims for ultimate realism and is designed specially for CoT V in combination with either ELFX, RLO or vanilla interior lighting. Revenant ENB targets mid-range to high-end systems with priority on visuals and effects, but people have the option to choose from four different performance presets to suite their needs, so an older or less powerful system does not have to be a limiting factor.
As of now, Revenant ENB does not use custom weathers. For this reason, not every weather will look as flawless as the other, simply because it’s impossible to make one single preset work with the hundreds of weathers that a weather mod brings into the game.
However, I strive to keep improving and updating Revenant ENB (both graphically and ENBSeries wise) until there’s literally nothing that can be improved while maintaining balance with only one configuration file. When I get to that point, I will start integrating custom weathers.
One unique feature that really separates Revenant ENB from most other ENBs out there, besides the highly detailed installation guide, is the ability to install this ENB using a mod manager of your choice to utilize the FOMOD installer, just like you would install any other mod in your mod manager. And if that wasn’t enough, it even comes with a new unique Setup script that offers you fully automatic (un)installation and configuration of Revenant ENB, ENBoost and Skyrim’s settings after installing it in your mod manager. In other words, no copying, pasting and editing files anymore!
The installation guide is divided into 4 main Installation Steps, plus reinstalling/updating and uninstallation instructions, which are all indicated with headings and bright green numbers.
If you want to switch to CoT V, or you are simply looking for something new or different than the old but good RealVision, go ahead and give Revenant ENB a try and leave a comment about your experience!
________________________________________________________________________________________
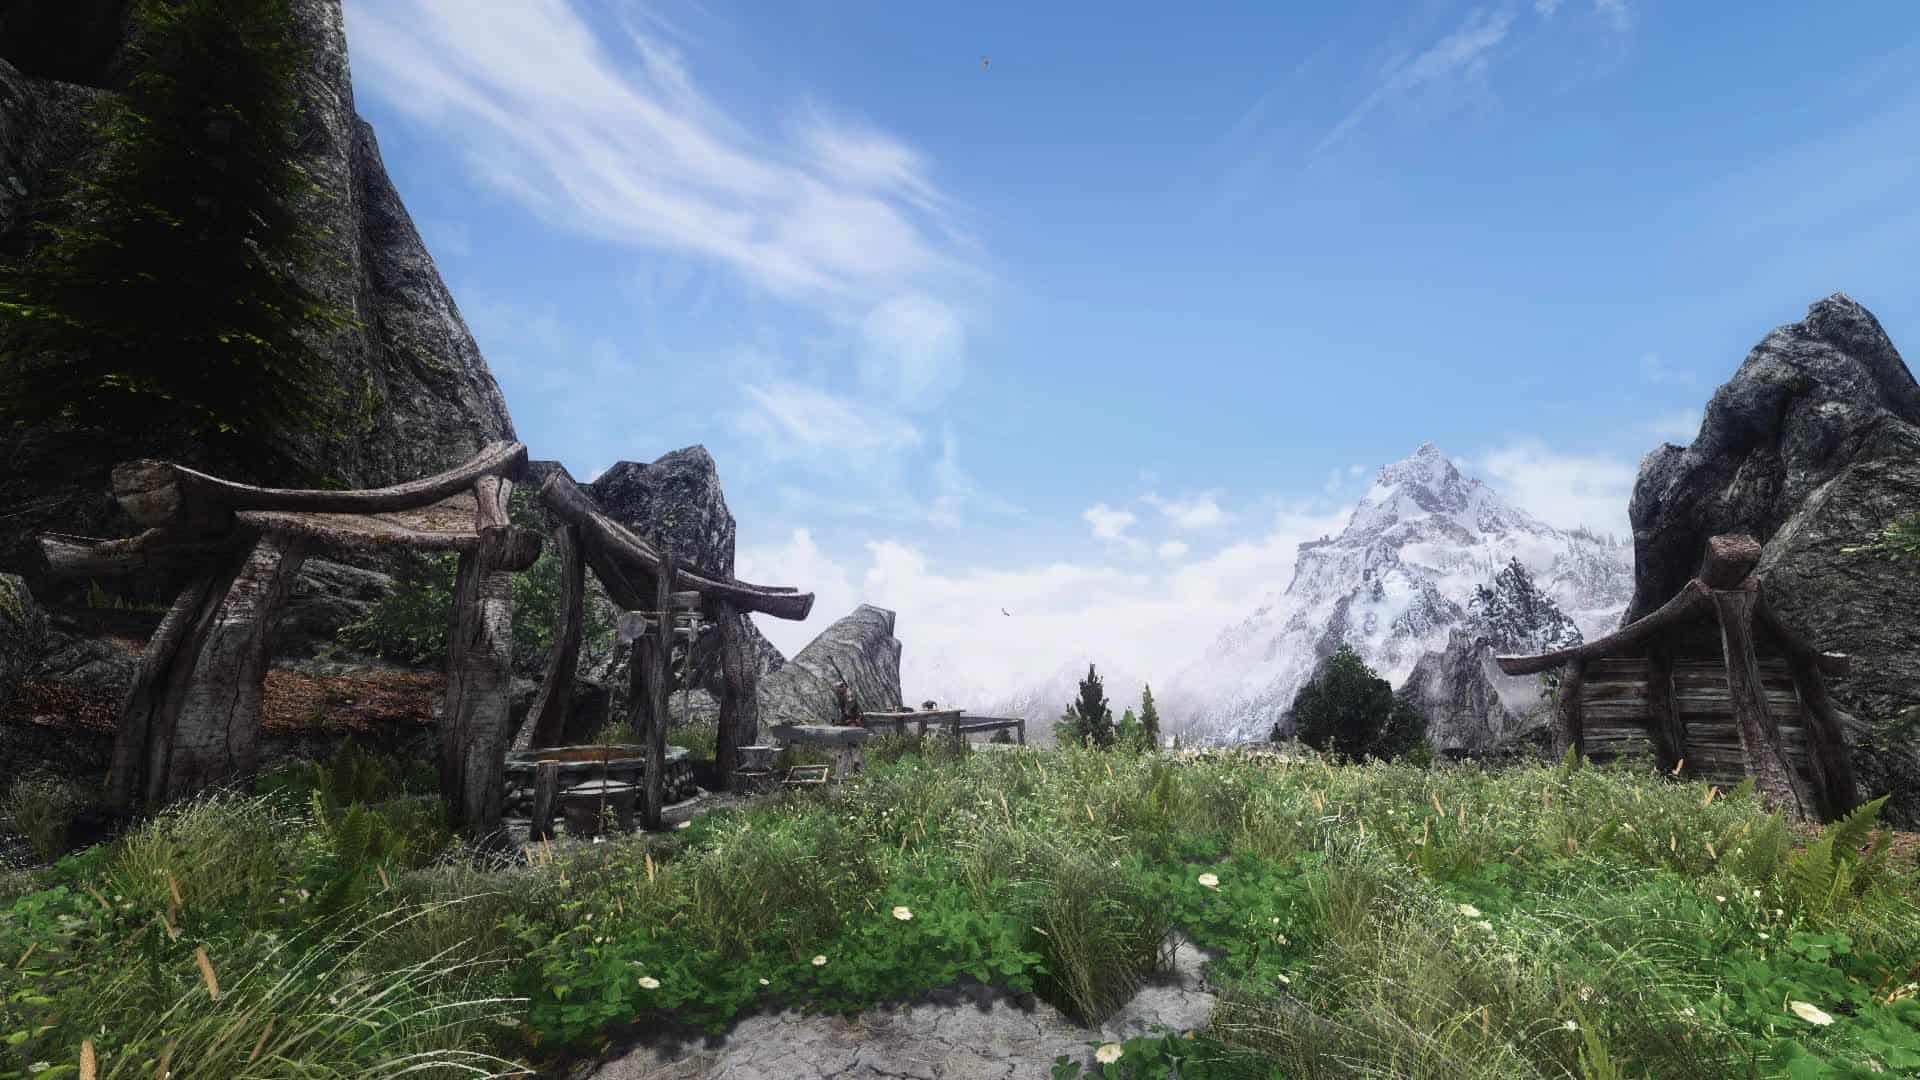
ENB is a collection of visual effects created by Boris Vorontsov. It overhauls everything from anti-aliasing and depth of field to lighting and water. It gives Skyrim the eye candy effects it deserves.
Revenant ENB is a finely tuned compilation of ENB effects and post processing. Each setting has been hand tweaked to deliver most realism at the lowest performance cost possible.
Technically, an ENB is compatible with every mod on the Nexus. However, Revenant is designed to look especially good with a particular set of lighting and weather mods. Using any weather or lighting mods beside the ones listed in this guide will result in your game looking weird. All other mods are fine.
ENB is very GPU intensive, and Revenant ENB is designed for mid-range to high-end systems with priority on visuals. It will most likely be the most FPS hungry part of your game. Its impact will be larger or more noticeable on low-end to mid-range systems though, with only a few mods installed. However, this doesn’t mean that Revenant can’t be used on older systems! This ENB comes with several performance levels to choose from to suite your needs, and you can disable even more effects if better performance is desired.
Improve the graphics and keep Revenant ENB updated for the latest ENB binaries
Make custom weathers + extensive weather patch (one of current projects, no ETA on that)
Make a preset for Mangaclub’s Vivid Weathers (maybe, no ETA on that)
________________________________________________________________________________________
Revenant ENB versioning scheme:
binariesRmajor.regular(.minor/bugfix)
Before we begin:
Revenant ENB is designed to be installed using a mod manager
I highly recommend you to start using Mod Organizer (MO) from now on!
IMPORTANT NOTES regarding Mod Organizer:
As you may have noticed, since version 1.3.11 MO is no longer officially supported for LE (v1.3.11 also doesn’t work properly anymore). Instead, go to this page and download “Mod Organizer 1 Legacy” from the Miscellaneous files section.
Updating from MO1 to MO1 Legacy:
To update your old MO1 installation to MO1 Legacy, I recommend this procedure: Go to your MO root folder and delete (or move/cut to a backup folder) everything EXCEPT your downloads, mods, overwrite and profiles folders. Then, open the new MO1 Legacy .zip archive you just downloaded and copy/drag ALL of its contents to your MO root folder (where your 4 remaining folders are located). You might have to log in again and reconfigure some of the settings when starting MO1 Legacy for the first time.
Updating from MO1 to MO2 (not necessary):
If you really want to update from MO1 to MO2, have a look at this video. Be sure to read MO2’s mod page description first to see what is different and to decide whether those changes are important to you or not, because MO2 handles some major features differently compared to MO1. MO1 Legacy still works fine, and some of you might think “don’t fix what ain’t broken”, like I do ^^
Mod Organizer will make your life, and also my life, so much easier! In addition, Mod Organizer is a lot less demanding in terms of rules and requirements in verifying scripts when it comes to installing (FOMOD powered) mods, whereas NMM will not allow any kind of deviation from its standards as it verifies these scripts before using them. NMM will just throw an error at you when it sees something it doesn’t like, preventing installation.
Don’t be afraid to switch, the process of installing mods is very similar. If you have any questions along the road, I’ll help you out personally!
________________________________________________________________________________________
2.1 Weather mods
>>> Revenant ENB is optimized for use with a particular set of weather and lighting mods, especially Climates of Tamriel V and Vivid Clouds and Fogs. Install these mods in this order:
Climates Of Tamriel – Weather – Lighting – Audio (CoT) by jjc71 – Install v5.0 using only the Default Experience settings in the installer, and also install the official DLC patches if you have those
Vivid Clouds and Fogs – Vanilla and Climates of Tamriel (VCaF) by Mangaclub – This is basically an extended, updated version the Weather Patch, but designed for CoT 5.0 with many great features! Install all 6 categories of preferred resolution in the first step, and also install the Extended Weathers: Groundfogs + Windyclouds for both Vanilla AND CoT. Optionally, also install the AOS patch if using that mod (if so, DON’T install the CoT 3.1 patch from AOS2)
>>> Not required, but still very much recommended (install after CoT and VCaF):
True Storms – Thunder and Rain Redone by fadingsignal – Install only for Vanilla, NOT for CoT (because of the patch below). Set Enable=false in the [RAIN]-section of enbseries.ini (or the in-game ENB GUI) to enable True Storms’ own rain textures if you prefer those over ENB rain
True Storms- Climates of Tamriel v5 patch by colinswrath – Install and load after TrueStorms.esp. It must be used INSTEAD of the CoT patch from the original True Storms mod
Real Skyrim Snowflakes – (Physical) Vivid Snow by Mangaclub – Hishutup – Kesta – Carefully read the description, especially the installation section! You have to install it using the installer and then run the script in TES5Edit. I don’t recommend using Physical Snow yet
Lightning during Thunder Storms by Minty – In the MCM-menu, I recommend changing the minimum and maximum cell distances for both fork and sheet lightning to 2 and 5 to avoid (almost) getting struck all the time or to avoid R.I.P.-headphone-users scenarios (lol), and also to see lightning more distant, which is more realistic imo
Lightning during Thunder Storms – Climates of Tamriel – Patch by Minty – Only if using the main mod of course, still works with CoT 5.0, but not all weathers will match perfectly
Obsidian Mountain Fogs For Legendary Edition by HiShutUp Arindel Dr Megaloblast
Morning Fogs Refined by egocarib
2.2 Lighting mods (interiors)
>>> Now decide to go on with Enhanced Lights and FX (ELFX), Realistic Lighting Overhaul (RLO), or neither of these.
These videos from Gopher might help you with your decision: Video 1 – Video 2
Option A: Enhanced Lights and FX (recommended, my personal preference!)
Install the latest version of Enhanced Lights and FX by anamorfus:
Window 1: Install ELFX Enhancer + ELFX – Exteriors + ELFX – Enhanced Ice
Window 2: Install SMIM Meshes if using SMIM (+ Moonpath and/or “No player home” patches if needed)
Window 3: Install No Candle Smoke if you prefer the candle smoke from Smoking Torches and Candles or don’t want both
Optional: Install Enhanced Torches and Fire for ELFX from my Optional Files and load after it
Option B: Realistic Lighting Overhaul (less realistic/refined than ELFX)
Install the latest version of Realistic Lighting Overhaul by The Realistic Lighting Team:
Window 1: Install all options (except “RLO Effects” if you prefer the candle smoke from Smoking Torches and Candles or don’t want both, but you’ll miss out on some other features)
Window 2: Install the CRF and/or IC patch if needed
Optional: Install Enhanced Torches and Fire for RLO from my Optional Files and load after it
Option C: Vanilla (new: vanilla interior lighting)
Choose this option to use Revenant ENB without any interior lighting mod (for your personal compatibility or performance reasons). It can also be useful when playing a quest/new lands mod that adds content not covered by lighting mods. This version of Revenant ENB further darkens and enhances the interiors in an attempt to somewhat match the ambient lighting levels of Option A and B together with the respective lighting mods.
However, this option will of course not look as great and realistic compared to using a real lighting mod, and keep in mind that you will also miss out on some of the additional features that these lighting mods come with.
Optional: Install Enhanced Torches and Fire for Vanilla Lighting from my Optional Files
===>>> NOW USE LOOT to sort your Load Order <<<=== ________________________________________________________________________________________ 3.1 Install DirectX If you haven’t already, download and install the “DirectX End-User Runtimes (June 2010)” from the Miscellaneous Files. It’s required for ENB to work! 3.2 Install ENBSeries Download ENBSeries v0.407 (latest v7, updated 2020-03-09) from enbdev.com (scroll down all the way to the bottom and click on the download icon) or mirror and put the .zip archive somewhere convenient on your PC. Extract the archive, open the folder, and copy ONLY d3d9.dll AND enbhost.exe from the WrapperVersion folder to your Skyrim root folder …\Skyrim\ (i.e. where “TESV.exe” is located). Alternatively, just open the archive and drag these 2 files from there directly to …\Skyrim\. 3.3 Activating Revenant ENB in your mod manager (FOMOD installer) Download Revenant ENB from the Main Files section using your preferred mod manager and install the options of your choice in the offered FOMOD installer, carefully reading the description of each option. When done, activate the mod. Installation Step 3.4 below is about the last step (step 8) in the FOMOD installer: installing Revenant ENB in your Skyrim root folder. >>> In the table below, you can see which effects are enabled and disabled for each performance preset, and also the quality level of the effects. Revenant ENB utilizes all existing ENB effects except “Prepass”, “SkinSpecular” and “ProceduralSun”. Therefore, other effects not listed in the table below will always be enabled by default in order to maintain the intended look.
3.4 Installing Revenant ENB in your Skyrim root folder (Revenant ENB Setup)
After installing AND activating Revenant ENB in your mod manager, one more step needs to be done to finish the installation: copying all the necessary files to your Skyrim root folder with the correct settings.
Installation instructions for this step are included in the last step (step 8) of the FOMOD installer, but here they are as well for your convenience in case you need to look back:
Automatic installation using the Revenant ENB Setup: (highly recommended)
For NMM/Vortex/Wrye Bash users:
Go to …\Skyrim\Data\Revenant ENB Files\, start Revenant ENB Setup.vbe, choose “Install” and follow the instructions.
For Mod Organizer (MO) users:
Go to …\Skyrim\Mod Organizer\mods\Revenant ENB\Revenant ENB Files\, start Revenant ENB Setup.vbe, choose “Install” and follow the instructions.
>>> If you don’t see the .vbe file extensions, don’t worry! This is just a matter of how Windows’ folder view setting are configured on your PC. Wanna know more? Just Google “hide extensions for known file types”.
Manual installation: (much more work and more error-prone)
For NMM/Vortex/Wrye Bash users:
Copy all files and folders starting with the letter ‘e’ from …\Skyrim\Data\Revenant ENB Files\ to …\Skyrim\.
For Mod Organizer (MO) users:
Copy all files and folders starting with the letter ‘e’ from …\Skyrim\Mod Organizer\mods\Revenant ENB\Revenant ENB Files\ to …\Skyrim\.
________________________________________________________________________________________
* VERY IMPORTANT: Installation Steps 3.5 to 3.7 are about correctly configuring your ENBoost, Skyrim and GPU settings for Revenant ENB!
3.5 Configuring ENBoost settings (enblocal.ini)
>>> You ONLY need to perform this step manually (using the spoiler below) if you have either:
skipped the automatic ENBoost configuration while performing an automatic installation using the Revenant ENB Setup
performed a manual installation of Revenant ENB by means of copying and pasting the files into your Skyrim root folder
3.6 Configuring Skyrim settings (Skyrim.ini & SkyrimPrefs.ini)
>>> This ENB comes with its own AA (anti-aliasing) methods, which are Edge anti-aliasing (EdgeAA), Sub-Pixel anti-aliasing (SubPixelAA) and Anisotropic Filtering (MaxAnisotropy). Therefore, any AA methods provided by Skyrim need to be disabled to avoid any conflicts. Also some other Skyrim settings need to be adjusted for the ENB to work properly.
>>> There are exactly 2 ways you can go about this:
Ignore the spoiler below. Use the fully automatic “INI Configurator” of the Revenant ENB Setup supplied by Revenant ENB (Revenant ENB Setup.vbe, also located in your “Revenant ENB Files” folder) to automatically configure your Skyrim.ini and SkyrimPrefs.ini settings (highly recommended). The INI Configurator will automatically make a backup of your INI files before doing anything. Also, don’t worry about any comments/annotations you’ve made in your INI files, they will remain untouched!
Manually configure your Skyrim.ini and SkyrimPrefs.ini settings, following the instructions in the spoiler below:
________________________________________________________________________________________
3.8 Optional & Miscellaneous Files
Take a look at my Optional and Miscellaneous files and choose your desired patches, plugins and other files!
3.9 Starting the game
Start your game using SKSE (skse_loader.exe) or TESV.exe. It’s neither recommended nor needed to use the Skyrim Launcher anymore because this can reset some of the Skyrim(Prefs).ini settings we just changed! Besides, you should be running your game with SKSE anyway if you are using/going to use the Skyrim SKSE Memory Patch from Installation Step 4.1 below, which I strongly recommend! I personally can’t even run VANILLA Skyrim without it!!!
3.10 Have fun!
This section applies to completely reinstalling or updating Revenant ENB after uninstalling it first.
This is NOT the same as rerunning the Installer of the Revenant ENB Setup. Repeating the installation multiple times from the “Revenant ENB Files” folder (after activation of Revenant ENB in your mod manager) will only allow you to reconfigure your ENBoost (enblocal.ini) settings or install different options of the same version of Revenant ENB, in which case overwriting your current installation (when prompted) is safe to do because the same Revenant ENB files will be used in this process, outside of your mod manager.
>>> In this context, a reinstallation of the same version of Revenant ENB in your mod manager would be performed if you wanted to change the options you selected in the FOMOD installer during a previous installation, like quality settings or optional effects. You don’t have to redownload Revenant ENB in order to reinstall it, providing you didn’t delete the original download archive which contains all the files.
Updating Revenant ENB of course means that a new version of Revenant ENB will be downloaded and installed in your mod manager.
>>> Did you make some significant changes to your enblocal.ini and/or enbseries.ini files after the installation and you don’t want to lose those changes? No worries! The Revenant ENB Setup will offer you to make a backup of these files when you reinstall (by overwriting) or uninstall Revenant ENB. This way, you can easily copy specific changes you’ve made back to the new INI files after updating or reinstalling.
Of course, you can also just replace newly installed INI files entirely with your backups, but ONLY do this when reinstalling the SAME version of Revenant ENB!
NEVER replace new INI files with old ones after updating to a NEW version of Revenant ENB (at least not without comparing the files), because this will probably negate the whole update, obviously!
5.1 First, regardless of whether you want to reinstall or update, you need to uninstall Revenant ENB from your Skyrim root folder in order to avoid any conflicts!
>>> If you performed an automatic installation in Installation Step 3.4, you can either uninstall Revenant ENB automatically using the Setup (recommended), or manually. If you performed a manual installation, you have to uninstall Revenant ENB manually.
Automatic uninstallation:
For NMM/Vortex/Wrye Bash users:
Go to …\Skyrim\Data\Revenant ENB Files\, start Revenant ENB Setup.vbe, choose “Uninstall” and follow the instructions.
For Mod Organizer (MO) users:
Go to …\Skyrim\Mod Organizer\mods\Revenant ENB\Revenant ENB Files\, start Revenant ENB Setup.vbe, choose “Uninstall” and follow the instructions.
Manual uninstallation:
Go to your Skyrim root folder …\Skyrim\ and delete all the files you’ve copied over to there when you installed Revenant ENB. If you’re not sure, go to your “Revenant ENB Files” folder and compare the files. All files and folders in the “Revenant ENB Files” folder that start with the letter ‘e’ should be deleted from your Skyrim root folder.
5.2 Then, deactivate and delete Revenant ENB in your mod manager. This way the ENB is now also deleted from the Data folder (or mods folder, for MO users).
You can also choose not to delete Revenant ENB and just completely overwrite/replace your currently installed version with a new one when you download and install that in your mod manager in the next step. Just make sure that you’re actually overwriting or replacing the entire mod, instead of just merging old and new files together.
5.3 Repeat the instructions in Installation Step 3 where applicable.
________________________________________________________________________________________
>>> Did you make some significant changes to your enblocal.ini and/or enbseries.ini files after the installation and you don’t want to lose those changes? No worries! The Setup will offer you to make a backup of these files when you uninstall Revenant ENB.
6.1 First, you need to uninstall Revenant ENB from your Skyrim root folder!
>>> If you performed an automatic installation in Installation Step 3.4, you can either uninstall Revenant ENB automatically using the Setup (recommended), or manually. If you performed a manual installation, you have to uninstall Revenant ENB manually.
Automatic uninstallation:
For NMM/Vortex/Wrye Bash users:
Go to …\Skyrim\Data\Revenant ENB Files\, start Revenant ENB Setup.vbe, choose “Uninstall” and follow the instructions.
For Mod Organizer (MO) users:
Go to …\Skyrim\Mod Organizer\mods\Revenant ENB\Revenant ENB Files\, Revenant ENB Setup.vbe, choose “Uninstall” and follow the instructions.
Manual uninstallation:
Go to your Skyrim root folder …\Skyrim\ and delete all the files you’ve copied over to there when you installed Revenant ENB. If you’re not sure, go to your “Revenant ENB Files” folder and compare the files. All files and folders in the “Revenant ENB Files” folder that start with the letter ‘e’ should be deleted from your Skyrim root folder.
6.2 Deactivate Revenant ENB in your mod manager. Deleting it completely is up to you.
6.3 Optional and only applicable if NOT reinstalling Revenant ENB again:
For NMM/Vortex/Wrye Bash users:
Go to …\Documents\My Games\Skyrim\
For Mod Organizer (MO) users:
Go to …Skyrim\Mod Organizer\profiles\*your profile name*\
Restore your Skyrim.ini and SkyrimPrefs.ini backup files (if you want).
Of course, you don’t need to do this if you like the INI tweaks suggested by Revenant ENB.